søndag 1. desember 2013

Lollipop Chainsaw costume + chainsaw 1.0

"Mmmmh strawberries, my favorite!"
 
 When I started on this costume I had no idea how to make a chainsaw, and now I have made two, and they both look awesome. I am equally proud of them both.
 
This post is just about my first chainsaw, but before I talk about my chainsaw progress I will show and tell you about my cheerleader costume, and the Nick head.  
The skirt wasn't easy to make at all. This part was actually the hardest bit about the whole costume. Making the folds and making sure they were not too thick for the sewing machine was the first big problem. To make the pink pieces stay on the right spot was problem number two. To solve that, I used double-sided viseline and ironed the pink in every folder. Sewing did not work since it really did not look good. When the bottom part was done, I sewed it together to the top part of the skirt. The top part of the skirt is an easy joining of two colors, straight with a little "V" in front.
The belt is faux leather that is sewed in two straight lines. I attached some metal grommets and found a useful belt buckle which is not easy to find. Skirt *sigh* done!    
How I made the top was to use a sports bra I already had, and sew the fabric to the sports bra. Pictures show very well how I did that. And the label is printed out on paper that is for ironing prints on clothes, so I just ironed it on my top.
 
Here is the transparent paper for your printer;

 
 "I love you Nick"
How to make a Nick head is to get your painting skills on and paint a face on a Styrofoam head, then glue a wig on, (of course I had to try the wig on myself first). Find a  neck protector and add a tie. And that's your Nick head.  
 
Chainsaw construction
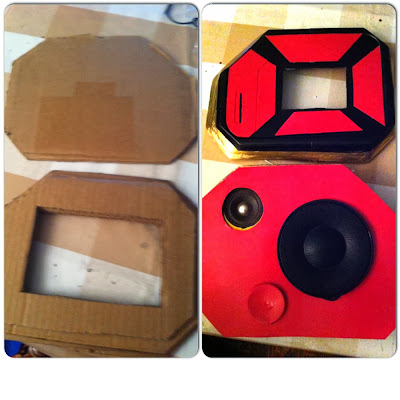
I started construction with some pieces of cardboard that I glued and shaped. I forgot to take pictures of the steps in between but basically I used a bunch of different garbage, and that's not easy to explain anyway. But I got very far with only using plaster and gold paint.
 I attached some circular speakers that will be plugged into my phone. So one side of the chainsaw will have speakers and play the soundtracks from the game (because that's what is going on in the game, she is going around listening to rock music while she is killing zombies "Genius"). And the other side of the chainsaw is my phone that controls the music, and gives the chainsaw a display.
 
Here is another in progress picture that is showing you what the rest of the chainsaw is made of. And that is a vine carton (goon box), and my mother's side grass cutter (it was practically broken before I ripped it apart). I attached these two together and filled the inside of the box with expanding foam, to stabilize the box. Then the paint job starts. It had to be painted black about five times to get a completely covered surface. While that was drying I made the blade.    

The blade is four layers of cardboard glued together and filled and shaped to perfection. I covered it with plaster so all the loopholes are filled. Next I had to sand it then repeat the process with plaster and sanding again.
I started spray painting it black first, then I covered it so I could only spray the silver on the spikes. Then I hand painted the pink in the heart and glued the metal dots on.
After I finished all of the black layers on this part I covered up the black I needed, so I could spray on a layer of gold. Then I attached the speaker and screen piece. Now the chainsaw only needs its red handle. 

To shape the handle, I used my hairdryer to bend a plastic pipe. I sprayed it red and then I attached it with screws, and the chainsaw is finished.
 
The final result  


tirsdag 19. november 2013

Masakaki

 
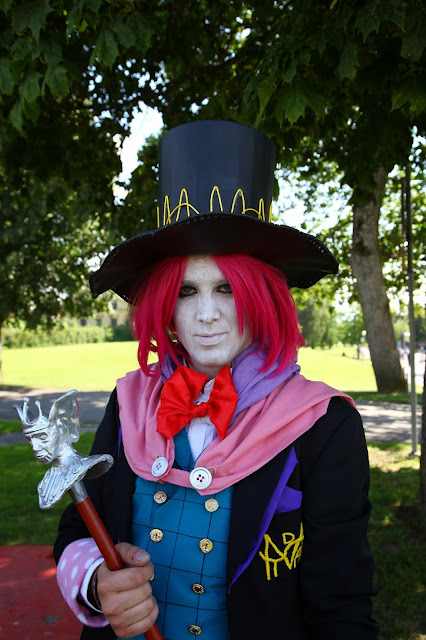
Masakaki from The Money of Soul and Possibility Control.
This is my first commission costume. Making a costume for someone else is a little bit more difficult, but it was very fun.
 
For anyone who want's to order something from me, just remember that I need to use you as a mannequin a couple of times, to make the fitting right. That means you can't live too far away.
 
Over to how I made it all.
First up I found a similar jacket and pants at a thrift shop. That made it easy for me to modify it to how it actually looks in the series.

I sewed purple cotton fabric around the collar and a little cotton piece to put in the chest pocket.  I could only find one type of fabric in pink with white polka dots and that was in fleece,
 so that just had to work.
For the Midas logo I had embroider it by hand.
 I sewed in some metal wires for making the jacket get the hourglass look as it is very anime style.
For the pants, I just shortened them to knee height.      
 
How to make a vest is simply use the patterns from your favorite vest that fit you perfectly. You use transparent food paper to draw the pattern on, cut out the patterns. Then transfer the pattern to the fabric and cut and sew the pieces together. And there you have a vest.
If the fabric is too soft as mine is here, just iron some vliselin on the backside of the fabric.
To make the out-lines beautiful and have it look good on the inside too, cut out another set of fabric in same size patterns and sew both sets together with the outside in and turn it inside out, then iron.
I had to line up chess patterns myself because I couldn't find any fabric with patterns on from the beginning, it's not that hard to do it yourself, just be patient and use a fabric marker.
Sew on buttons and buttonholes then the vest is finish.
 
How to make a hat, I did it the same way I made my Steampunk hats. The only different part was this is more round and very big, and the gold patterns are gold ribbons that are superglued on.
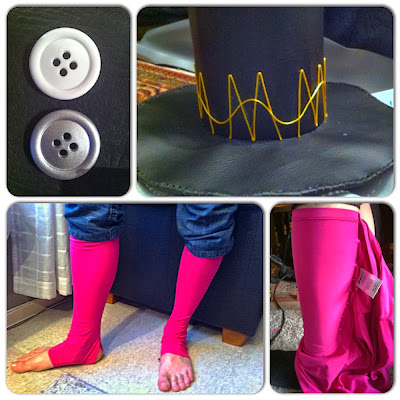
The buttons are spray painted silver and are for the pink and purple capes.
When it comes to the "hot pink" knee high socks, you would think it's easy to find them in any store or on eBay, that's at least what I thought, but NO. I looked everywhere and nothing to be found. So I had to improvise. I bought a sweater on sale from Gina Tricot and sewed it to some legwarmers. No one will tell the difference.
 
  How I made the cane.
First off I needed to find the cane itself. After going to twenty different thrift shops I found one. And the fun begins, all I had to do with the cane was cutting off the top, sanding it, and give it a nice layer off red oil base. 
I shaped the face in clay and made it ready for the ears to be glued on.
The ears are just Werewolf Ears.
Making the triangle where "Midas" is written I laid Paper Mache over a soda can, let it dry and laid plaster on top, let it dry and sanded it down. Repeat with plaster and sanding, and use more clay to shape the neck. 
After it dries then add the "Midas" letters with a glue gun. 
I spray pained it with a base paint that will protect the plaster and clay before I sprayed it with silver paint.   
 
The final look
Chris André Aakre in full suit
 
Me as Kida from Atlantis and Chris André Aakre
Close up shot of Chris André Aakre and details around the neck 
 

onsdag 30. oktober 2013

Zombie Mania

 
Happy Halloween


For your Halloween entertainment I thought a zombie tutorial, or five was in order.  I will start with the trio in Brisbane.


The makeup I have chose for myself is going to be an open throat, which is a style I have done a couple of other times already. Only different this time was that I added a special effect to pump blood.
It worked for a good while but it was very messy. It's a perfect detail for a zombiewalk, but for just going around in the city, shopping malls and random bars, it was too messy.
It was fun to try something new and special so I will definitely try this again on a zombiewalk. 
 
But to show you what I did, and starting up with the extra special effects, then I will go true basic making of the open skin look.


#1  The leaking throat;
 
So this is an "I hart Australia" drinking bag, attached to a soap dispenser pump, that are attached to four straws, and everything is hold together with duct-tape.
  
Tape it on to your skin with appropriate tape (not gaffa), and cover it up with liquid latex and tissues. Cover that again with cheap concealer and try to get a grey tone to your skin all over. How to get the open skin look and color is shown better on pictures further down.
 
 
#2 Open flesh shown teeth look
A tutorial I copied from Chrix Design
  
 
First off cot and line up the fake nails to use as teethes. Than you have to cover your nose, chin, cheeks and lips with liquid latex and tissues, use several layers on this step, because you have to take it off in one piece to be reused. (So you don't have to make everything in one go the day of your zombie mayhem). I used "child proof" crafting glue for adding the teeth. It will take a little while to dry, be patient.    

 
Before you take it off, and you are waiting for the glue to dry, it is perfect to paint some color and details. I used acrylic paint, first red, than a brown color around the teeth.

 
On the day you will be using this mouthpiece add another lair of tissues and liquid latex, mostly on your nose and cheeks to make the torn skin. Use concealer and a grey body paint to get a grey skin tone when its dry. Then open the latex around your mouth and nose, just enough to fit the mouthpiece you have already made, use another lire of latex on your lips and nose and use spirit gum inside the mouthpiece, and then place it in the right spot. It takes some patience to get it in the right spot, but once it's there and the spirit gum have dried than you can start painting and put makeup on. Note that you can reverse the steps and make all in one go, then you start with this step and add more latex, tissues, teeth and paint inside the "open flesh hole", this requires a bit more finesse, but you can do it. 
Wherever you use latex and tissues, you can paint over it with acrylic paint, I use black on the inside of the open latex, than fake blood on top of the black. That makes it look glossy and nasty but also fresh. 
The fresh looking zombies are the funniest to make, that means your skin doesn't have to look too dead, and that's easier to work with, and you can have more fun with blood (because too old zombies don't have any blood left in them).
 
 
#3 the dangling eye effect
 
 
This is the first time I'm making a popping eye effect, and the Styrofoam ball I found was a few millimeters too big but it worked, I only regret that I didn't paint the eyeball in a more yellowish tone, it was too white in my opinions.
Other than that it looked awesome and it was fun to make another new effect, and I will definitely make something like this again.
 
Over to how I did it, like you can see I used a Styrofoam ball and painted it as an eye, and the last picture there I mixed liquid latex with some red acrylic paint, which means when it has dried I can take it off the plastic bag it's lying on.

 
Use a thick layer of tissues for the eye and enough to rip open for the falling out effect. Than again with the concealer and gray body paint to cover up the tissue. I used acrylic paint wherever the latex was covering and I used makeup (eye shadow and eyeliner) for the bruising around the wound. Top it all with fake blood.
 
 
Blood recipe
1cup water
1cup corn flour
1cup cacao powder
1flask of red food color
1 cup of dark thick syrup


The basic zombie makeup
 
 
  1. Liquid latex and tissues where ever you want an open wound
  2. Use concealer on the latex piece on your skin before ripping it open. It's easier that way.
  3. When you have the base color you want for your zombie skin than you can rip the latex open. Use tweezers and your fingers to open, not scissors, only for safety reasons.
  4. On this picture I used eyeliner on the inside of the wound and dark eye shadow on the outside.
  5. Use red lip-gloss and lipstick for a red- and redglossyness.
  6. Use blue, yellow eye shadow for broses look
  7. Use blue, red and yellow eyeliner for a blood vane look, and infected look.
  8. I found out that Australian vegemite is good for zombie effect. It has a brown paste look and makes a final touch for some of my zombie makeup.
  9. And always the completely final look is to add the fake blood.

 
I hope you enjoyed my zombie tutorial.
For your pleasure here are some photos of different zombie makeups I have done


torsdag 24. oktober 2013

Kida the Atlantis princess

 
How to shape a gigantic mask!
First I sprayed expanding foam on a huge piece of cardboard. It's important to wait until it is completely dry before shaping it, as it a bit toxic and can ruin your knives. 
 
 
I used a little knife with a bent blade because that is easier to shape round surfaces with. After the shaping of the foam I laid a lair of Paper Mache.
Paper Mache is newspaper dipped in a wet mix of water and flour. 

 
I added the teeth from leftover foam and I used  half of a clothes hanger for the longer teeth. Than I added plaster on it to get a smooth surface. Sanding, sanding, plaster and more sanding. Then I got the smothered surface I needed.


I sprayed the whole mask with a paint that will protect the plaster. It's just a base paint.

Than the acrylic paint of fun start, I did this part with my best friend, Kristina Johansen, she helped me to mix the right color and she deserves credit for that. It is always better to be creative with others.


Adding fur and lights really made the final look, and adding the backpack on the inside made it easy to wear, not that I saw much by wearing it anyway. I had my own setup to have fun in there. I had water bottle with a straw, my phone hang in there and I had a brush for my wig, all the important stuff for a convention day.


You can see the backpack set up at the picture above. I made her jewelry crystal from a stone and metal wire, very basic. Her top is just a top from Gina Tricot. The skirt is easy sewn out of three colors together to match her skirt, I didn't use a pattern or anything, only free hand. And for her legwarmers and armwarmer, I just used the same fur fabric I had for the mask.


Making the armor pieces was only Paper Mache over balloons and a plastic bottle. The same goes with plaster and sanding for a nice smooth surface.
 
 
After getting the smoothness I desired I painted it with normal acrylic paint. (the spikes are just thick cardboard stuffed with more plaster)
On the inside of this armor I used a lot of duct tape to make it stronger.


The final touch it the styling of the wig. This was my first styling of a wig, so excuse my "noob" job. You can see how I did it on the picture above.
 
Then I would show all the fantastic pictures Danarki have taken of me in my Kida outfit.